Why You Should Inspect Your Roof (Without Risking Your Neck)
Your roof silently protects your home day in and day out, facing brutal sun, pounding rain, and howling winds. Yet most homeowners rarely give it a second thought—until water starts dripping onto their dinner table.
The good news? You don't need to risk life and limb climbing onto your roof to check its condition. As James Turner, owner of Best Roofing Now, likes to say: "The safest roof inspection is the one where your feet never leave the ground."
This guide will walk you through how to spot potential roof problems using nothing more complicated than binoculars and your smartphone camera. Let's keep you safe while keeping your roof in top shape!
Start Inside: Your Attic Tells Roof Secrets
Before you even step outside, your attic can reveal major clues about your roof's health:
What to Look For in Your Attic:
- Light beams: If you can see daylight peeking through, you've got openings that are letting water in too
- Water stains or streaks: Brown, yellow, or gray discoloration on wood means moisture has found its way in
- Sagging decking: The wood between rafters shouldn't sag—that's a sign of long-term moisture damage
- Mold or mildew: That musty smell and dark spots signal trapped moisture
- Wet insulation: Properly functioning roofs keep insulation dry
Pro tip: Do this inspection on a sunny day with your attic lights off to make light penetration easier to spot.

Ground-Level Inspection: Your New Weekend Skill
Now it's time to head outside and walk the perimeter of your home. Here's your ground-level inspection checklist:
Equipment You'll Need:
- Binoculars (the sharper, the better)
- Smartphone with camera
- Notepad or inspection checklist (download ours at the end!)
- Bright, sunny day (makes shadows and irregularities more visible)
The Walk-Around Method:
- Start at one corner of your home and work systematically around the entire perimeter
- Stand back far enough to see the full roof slope without straining your neck
- Use binoculars to scan each section in a grid pattern (left to right, top to bottom)
- Take photos of anything suspicious for later reference
- Note the location of potential problems on your checklist
"The best time to check your roof is when you're not in emergency mode," says our team at Best Roofing Now. "Preventative inspections save thousands in potential damage."
What Exactly Are You Looking For?
Different roofing materials show damage in different ways. Here's your cheat sheet:
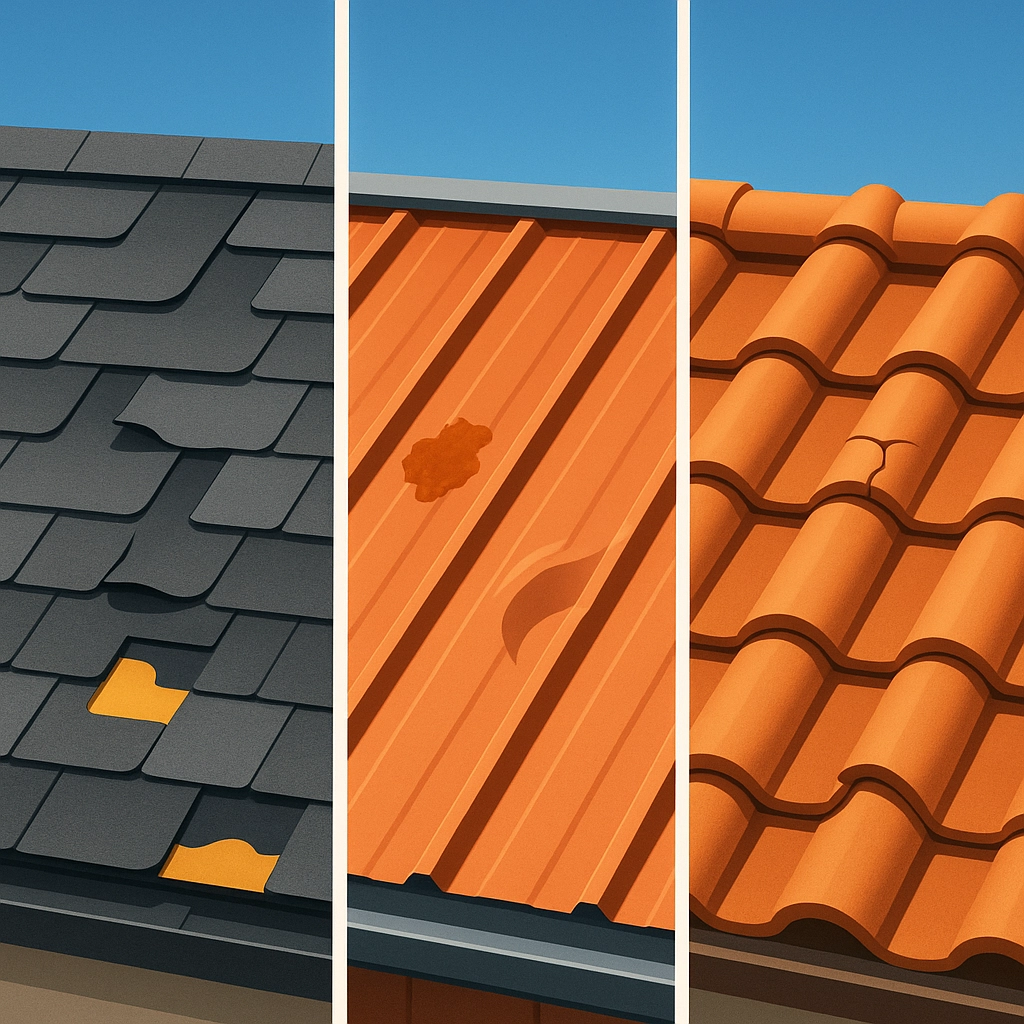
Asphalt Shingles Issues:
- Missing shingles: Gaps in the otherwise uniform pattern
- Curling edges: Shingles that lift at corners or edges
- Bald spots: Dark areas where granules have worn away
- Cracked shingles: Often visible as darker lines across shingles
- Moss or algae growth: Green or black discoloration
Metal Roof Problems:
- Rust spots: Orange or brown discoloration
- Loose panels: Gaps or misalignment
- Dented sections: Usually from hail or fallen branches
- Failing seams: Where panels join together
Tile Roof Concerns:
- Cracked or broken tiles: Often visible even from ground level
- Displaced tiles: Tiles that have shifted from their original position
- Deteriorating underlayment: Visible as sagging between tiles
Problem Hotspots: Where to Focus Your Attention
Some areas of your roof are more vulnerable than others. Pay special attention to these trouble zones:
1. Roof Valleys
Where two roof slopes meet, water naturally concentrates during rain. Look for:
- Missing shingles
- Excessive wear
- Debris buildup
2. Flashing Areas
Metal flashing creates waterproof seals around roof penetrations. Inspect around:
- Chimneys
- Vents and pipes
- Skylights
- Where roof meets walls
3. Eaves and Overhangs
These areas often show the first signs of problems:
- Water stains
- Peeling paint
- Rotting wood
- Visible sagging
4. Gutters and Downspouts
Your gutter system offers major clues about roof condition:
- Excessive granules (looks like coarse black sand)
- Shingle fragments
- Backed-up water
- Sagging sections
"Your gutters are like your roof's health report card," we tell our customers at Best Roofing Now. "When we see excessive granules in gutters, we know that roof is crying out for attention."
Advanced Ground Techniques: Get a Better View
Want to level up your inspection game without climbing a ladder? Try these techniques:
Zoom and Enhance
Modern smartphones have impressive camera zoom capabilities:
- Use your phone's highest optical zoom (not digital zoom)
- Take multiple photos of suspicious areas
- Review the images on a larger screen later
- Use photo editing apps to brighten and enhance details
The Second-Story Window Method
If you have upstairs windows with roof views:
- Open windows in rooms adjacent to roof sections
- Use this vantage point for closer inspection of normally distant areas
- Take photos through the window for later review
Binocular Sweep Technique
Proper binocular use makes all the difference:
- Start at the peak and work systematically downward
- Brace against something solid to reduce shakiness
- Adjust focus for different distances
- Scan slowly in a systematic pattern

The Post-Storm Inspection: Timing is Everything
After severe weather is when your roof is most vulnerable. Here's what to look for after:
After High Winds:
- Loose or missing shingles
- Debris on roof
- Shifted ridge caps
- Damaged vents or flashing
After Hailstorms:
- Small dark spots where hail hit
- Dented metal vents or flashing
- Granules collected in gutters
- Dimpled surfaces
After Heavy Rain:
- Water pooling anywhere
- Overflowing gutters
- Water stains on exterior walls
- Damp spots in attic
When to Call the Professionals
Your DIY inspection is valuable, but there are clear signals that it's time to call in the experts at Best Roofing Now:
- Multiple missing or damaged shingles
- Visible sagging in any roof section
- Interior water stains that appeared suddenly
- Significant granule loss in gutters
- After any major storm with visible roof debris
- Every 3-5 years for professional inspection regardless of condition
Remember: the cost of a professional inspection is minimal compared to the expense of repairing water damage from a failed roof.
Creating Your Inspection Calendar
Consistency is key with roof maintenance. Here's an ideal inspection schedule:
- Spring inspection: Look for winter damage
- Fall inspection: Prepare for winter weather
- Post-storm checks: After any severe weather
- Professional inspection: Every 3-5 years minimum
Use your phone's calendar to set reminders, and keep your inspection notes in one place to track changes over time.
The DIY Inspection Log: Your Roof's Health Record
Keeping records of your inspections creates a valuable history of your roof's condition. Your inspection log should include:
- Date of inspection
- Weather conditions
- Specific issues found
- Photos of problem areas
- Notes on changes since last inspection
- Follow-up actions taken
This documentation not only helps you track developing issues but can be incredibly valuable when filing insurance claims or selling your home.
Your Next Steps: From Inspection to Action
Once you've completed your inspection, you'll be in one of three situations:
-
All Clear: Your roof looks great! Schedule your next regular inspection.
-
Minor Issues: You've found some areas of concern that bear watching or simple maintenance.
-
Problems Found: You've identified issues that need professional attention soon.
For minor issues, regular monitoring may be sufficient. But when you spot concerning damage, don't wait—contact us for a professional assessment before small problems become big expenses.
Conclusion: Peace of Mind Starts with Awareness
Your roof is your home's first line of defense against the elements. By spending just 30 minutes on a regular ground-level inspection, you can catch problems early, extend your roof's lifespan, and avoid costly emergency repairs.
Remember, the most expensive roof repairs almost always come from problems that were small and fixable months or years earlier—if only someone had looked up and noticed.
Ready to become your home's roof guardian? Start with our comprehensive checklist that walks you through exactly what to look for and how to document it.
🔍 Download the DIY Inspection Guide
Need professional help or have questions about your roof inspection? Our team at Best Roofing Now is always here to help. Contact us for personalized assistance with your roofing needs.